How MyWorks Sync handles orders with tax applied to them in WooCommerce depends on whether you have Automated Sales Tax enabled in WooCommerce or QuickBooks - or not.
- If Automated Sales Tax is being used in either WooCommerce or QuickBooks:
- Visit our Automated Sales Tax Doc that explains how the sync will work, as no further configuration is required in our sync.
- If Automated Sales Tax is not being used in either WooCommerce or QuickBooks:
- This means you have specific tax rates you're manually managing in both WooCommerce and QuickBooks. Read on to learn how to map these together easily.
When you have specific rates set in WooCommerce and QuickBooks, you can easily map them together by visiting MyWorks Sync > Map > Tax Rules. This page is a visual representation of your WooCommerce Tax Rates (shown on the left side) and your QuickBooks Online tax rates (shown on the right column, in the dropdown).
Setting up your tax rates
The best way to handle setting up taxes if either your WooCommerce or QuickBooks Online is starting fresh is the following steps, in the order listed:
- Set up/configure your WooCommerce Tax Rates. This can be done in WooCommerce > Settings > Taxes in your admin.
- Set up/configure these same tax rates in QuickBooks Online. This can be done in Taxes > Edit Sales Tax Rates / Agencies in QuickBooks Online.
Mapping your tax rates
Once taxes are set in both systems, visit MyWorks Sync > Map > Tax Rules. You may then choose the QuickBooks Online tax rate in the dropdown on the right that corresponds to the WooCommerce Tax rate listed for that row.
Mapping combined tax rates
Our sync is compatible with Combined Tax Rate setup. The best way to handle combined tax rates is by creating them first in WooCommerce, then creating the combined tax rate in QuickBooks Online. Then, in our Tax Rules mapping page, you can map the two tax rates in WooCommerce to the one combined rate in QuickBooks Online. This can be done by using the second row with a + sign in front of it, under each basic WooCommerce Tax rate row.
This combined tax rate setup is most common in Canada, where GST and PST are normally charged to one order, for example.
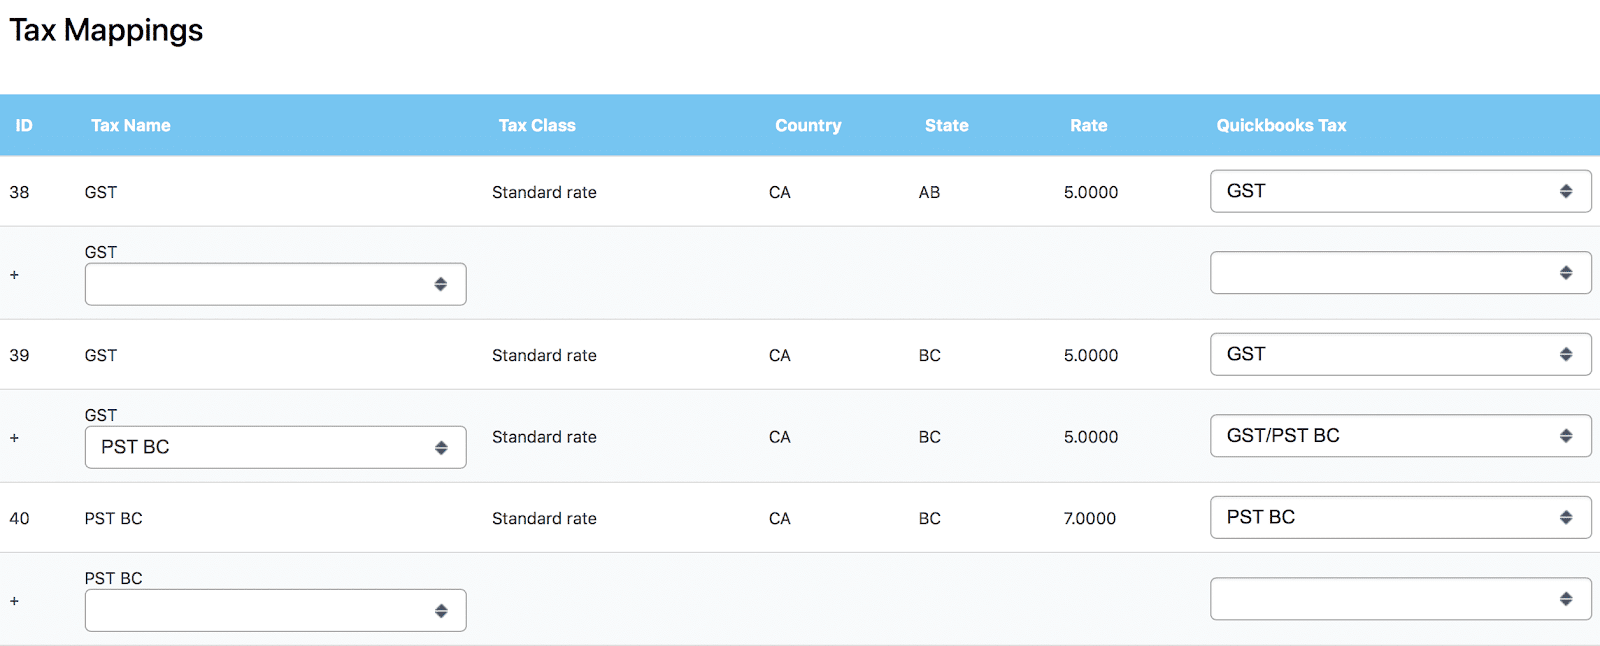
Here's a standard example, with a screenshot:
- GST 5% for Alberta in WooCommerce is mapped to the corresponding GST 5% rate in QuickBooks Online.
- GST 5% for British Columbia in WooCommerce is mapped to the corresponding GST 5% rate in QuickBooks Online.
- In the combined tax rate row (denoted by the + sign), the WooCommerce GST 5% Rate + the PST BC 7% Rate for British Columbia is mapped to the combined tax rate "GST/PST BC" in QuickBooks Online.
- PST BC 7% for British Columbia in WooCommerce is mapped to the corresponding PST BC 7% rate in QuickBooks Online.